WARNING: All technical data in this publication, especially for handloading, reflect the limited experience of individuals using specific tools, products, equipment and components under specific conditions and circumstances not necessarily reported in the article and over which the National Rifle Association (NRA) has no control. The data has not otherwise been tested or verified by the NRA. The NRA, its agents, officers and employees accept no responsibility for the results obtained by persons using such data and disclaim all liability for any consequential injuries or damages.
From the vault: Part two of our Introduction to Metallic Cartridge Reloading. As published in the May 2001 issue of Shooting Sports USA. (Read part one here.)
Introduction to Metallic Cartridge Reloading, Part II
Walking Through The Reloading Process
By Stanton L. Wormley, Jr.
In this, the second installment on metallic cartridge reloading, we'll follow the sequence of steps involved in reloading a rifle cartridge and refining a metallic cartridge load. These steps are based on the use of a single-stage reloading press and a separate priming tool.
Before you begin to make your own ammunition, ensure all your components and reloading data are current. Both component specifications and reloading data can vary over the years due to changes in component specifications and safety standards. Using old components with recent data—or vice versa—is asking for trouble. Moreover, some components such as powders can deteriorate with time, particularly if they have been stored in areas of high heat or humidity.
It's also important to make sure all the components you plan to use match published reloading data. Few things are more frustrating than sitting down to reload and finding out that none of your reloading manuals lists a load that uses the components you have on hand. You may yield to the dangerous temptation to substitute one bullet, primer type or brand of case for the one listed in the manual. Avoid this dangerous trap by making sure you have the proper components before you commence a reloading session.
Step 1
Clean, inspect and sort the cases. Clean the cases first, because defects such as cracks in the case mouth or body show up better on clean, shiny cases. After cleaning, inspect the cases individually for such defects. During this process, it's easy to sort the cases according to manufacturer and put them in loading blocks to create batches of 50 or 100 cases.
Step 2
Select the proper shell holder and fit it onto the ram. Most reloading manuals have tables showing the prop er shell holder for a given cartridge.
Step 3
Fit and adjust the sizing die in the press. Normally the sizing die is screwed into the press until it just touches the shell holder when the ram is at maximum height (or just shy of contact when carbide dies are used). You must adjust the decapping pin to fully push out the spent primer without the expander ball hitting the web of the case. All new dies come with instructions on their use.
Step 4
Lubricate the cases. Case lube (available in solid, liquid or spray form) prevents cases from becoming stuck in the die and decreases the effort needed to work the press. With a bottleneck case, lube is applied only to the case body, not to the shoulder. Case lube is not needed with carbide or titanium nitride-coated dies.
Step 5
Resize and deprime the case. Running the lubricated case fully into a properly-adjusted die will both resize the case to its original dimensions and remove the spent primer. Additionally, the resized case neck is restored to the proper inside diameter as the expander ball is withdrawn from the case. After resizing, remove any remaining lubricant from the cases.
Step 6
Measure case length. Both shooting and resizing can cause cases to lengthen, so it is necessary to measure each case with a dial caliper or case length gauge to make sure it falls within proper limitations. A case that is too long may fail to chamber. Moreover, the mouth of an overlong case can be crimped inward inadvertently by the case mouth shoulder in the chamber, resulting in a potentially hazardous pressure increase.
Step 7
Trim the cases. Use case trimmer to cut excessively long cases balk to the "trim-to" length listed in the reloading manual; follow the directions that accompany the trimmer.
Step 8
Deburr and chamfer the case mouth. Use a chamfering tool to remove burrs or rough spots from both the inside and outside edges of the case mouth. Additionally, a slightly chamfered or beveled mouth will facilitate bullet seating.
Step 9
Clean the primer pocket. When primer residue and other matter collect in the primer pocket, primer seating becomes inconsistent, primer ignition becomes erratic and load performance suffers. Primer pocket cleaners remove this residue. Inspect the flash hole for burrs or obstructions. Military cases being reloaded for the first time must have the crimp removed before they will accept a new primer.
Step 10
Prime the case. Seat each primer with uniform pressure all the way to the bottom of the primer pocket. Moderate resistance should be felt as the primer is seated. Make sure the seated primer does not protrude above the level of the case head.
Step 11
Measure the powder charge. Use a reloading scale to weigh the powder charge for each case. An alternative is to use a powder measure to quickly meter the appropriate charge with the turn of a crank. Since the charges thrown by a powder measure can vary somewhat, a measure should never be used for maximum loads. Throwing consistent powder charges using a measure depends upon consistent operation of the measure's opening handle. Also, when using a measure, verify the charge it throws every five to 10 rounds. NEVER exceed the maximum powder charge listed in the reloading data.
Step 12
Check the powder charge. Once you have filled all the cases in the batch with powder, visually ensure that each case has the proper amount of powder. With all the filled cases upright in the loading block, case light at an angle into the case mouths. Any variations in the powder charge will be readily apparent. Alternatively, you can use a depth gauge, such as a marked piece of dowel rod, to check the powder level of each case.
Step 13
Seat the bullet. The seating die must first be adjusted. Unscrew the bullet seating stem several turns and screw the die into the press just far enough that the mouth of an empty case just contacts the crimp shoulder in the die. Then back the die off ⅛ turn and lock it in place. Next, with the seating stem still backed off and an empty case still in the shell holder, insert a bullet of the proper type into the case mouth and run the case into the seating die. Resistance will be felt when the die begins to push the bullet into the case neck. Initially the bullet will protrude excessively from the neck. Screw in the seating stem a little at a time and keep running the case into the die, measuring the cartridge overall length (OAL) each time with a dial caliper until the proper length is attained. If a crimp is required, back off the seating stem a turn or so, screw in the seating die body until the crimp shoulder produces the proper amount of crimp in the case mouth, and then readjust the seating stem for proper cartridge OAL.
Proper seating depth is critical. Too much bullet protrusion and the cartridge may not work through the gun's magazine, or it may fail to chamber. Too little and the bullet intrudes excessively into the powder chamber, decreasing volume and raising pressure. Neck tension is also important; any bullet that fails to seat with some resistance may be held only loosely by the neck and may be driven back into the case when the round is chambered, especially in semi-automatic arms.
Step 14
Identify the reloaded cartridges. Both for safety reasons and for general record-keeping, you must label each box of reloaded cartridges you make. The label should contain all the details of the load, the number of times the cases have been trimmed and reloaded, the overall cartridge length and the date the reloads were made.
Testing and Refining the Load
After you've mastered the basic technique of assembling safe, functioning loads, you likely will want to refine your loads to improve accuracy, trajectory and terminal performance.
As your test loads approach that "perfect" load, groups will tighten. Once you have established that the best accuracy is obtained with, say, between 40 and 41 grains of Powder X, you can load an additional series of test cartridges having finer powder charge increments (such as 40.0, 40.2, 40.4, 40.6, 40.8 and 41.0 grains of Powder X). Careful record-keeping is critical for a proper analysis of the test-fire results.
Signs of High Pressure in Metallic Cartridges
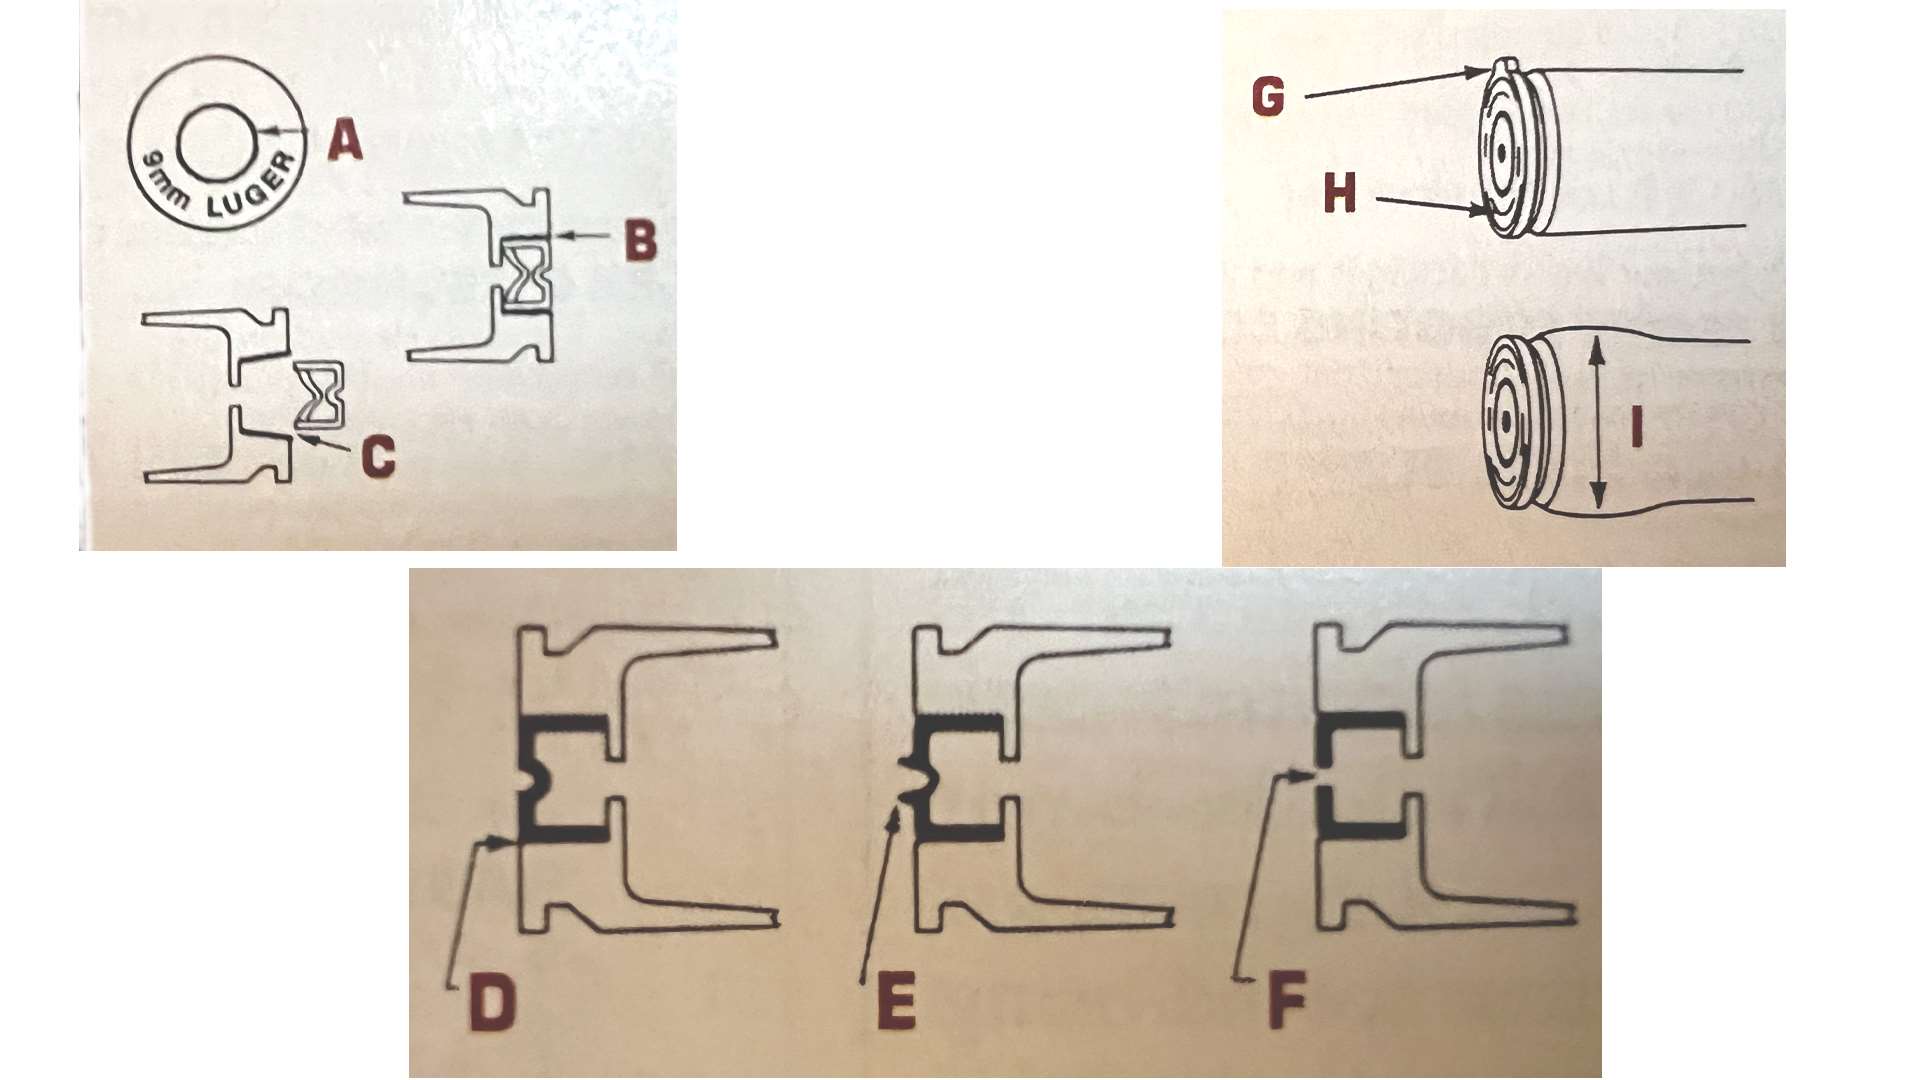
Above: The reloader must be able to recognize signs of high pressure, such as (A) a sooty ring of escaped gas around the primer, (B) enlarged primer pocket with smudges from gas leakage, leaving primer loose, (C) a completely open primer pocket, which frees the primer, (D) flattening of the primer, (E) cratering of the primer, caused by the extrusion under pressure of primer cup material into the firing pin hole, (F) perforation or rupture of the primer, (G) flowing of brass into the extractor or ejector recesses, (H) engraving of breech-face marks onto the case head and (I) expansion of the case head.
Safe Storage of Ammunition and Components
- Always store reloading components in their original factory containers.
- Always store reloading components away from heat, moisture and exposure to open flame.
- Be extremely careful and alert when dealing with live primers. Careless handling that ignites one primer can cause others in the vicinity to detonate.
- Never store powder and primers in the same location.
- Store reloading components where children and unauthorized persons cannot have access to them.
Most Popular