** When you buy products through the links on our site, we may earn a commission that supports NRA's mission to protect, preserve and defend the Second Amendment. **
The term “zero” means finding a sight setting that, under some set of conditions, results in a centered shot group. Those conditions include distance, ammunition, and event. Other variables that factor in include rifle, temperature, atmosphere, place, yet the list can continue.
 My no-wind zero is established and recorded for the 300-yard Rapid Fire event (prone). The wind/elevation setting gives me a centered group in calm conditions. When I go from there to 200-yard Slow Fire (standing), 200-yard Rapid Fire (sitting), and 600-yard Slow Fire (prone) events, the sight setting that gets me centered on each target is my “event zero.” The event zeroes are recorded settings that are written as additions or subtractions from elevation, and more or fewer windage clicks, but written with respect to the no-wind zero.
FINDING MECHANICAL ZERO
Mechanical zero, as I define the term, is literally putting the rear sight in the center of its wind adjustment range. Establishing a mechanical zero that also coincides with a no-wind zero requires some capacity to move the front sight, but we’ll cover that shortly.
Here’s how to find mechanical zero; only speaking to windage adjustment. Run the rear sight in one direction, left or right, until it stops. Make sure the final stop is a true click, and not just snugging the wind knob against the limit of the rear sight aperture’s movement. Count the number of clicks in one direction, then again going the other direction until it stops. Make sure the last one or two clicks are still “free” or still resulting in click-stop sight movement. Divide by two. Then count that number of clicks in toward center. Record this. If you want to mark this indication on the rifle, stick a piece of masking tape on the rear sight base and make your mark on the tape. I wouldn’t advise a permanent mark yet.
To get a mechanical zero to coincide with actual no-wind zero we need a front sight that can move left and right. Chances are slim that putting a rear sight in the center of its adjustment range will result in wind-centered shots on target. Even if all alignments were spot-on, ammunition and shooter position variables come into play. AR-15’s have been modified to allow for front sight housing relocation, which functions to provide wind adjustment.
SIGHT ELEVATION
 A good starting point for front sight elevation is to have the top of the post 0.200 inch above the sight housing. Use the depth measuring utility on a caliper to make it easy.
Last thing before we get started, run the rear sight all the way down to its bottom. Make sure the last click before it bottoms is a full click. With a satisfactory click, go ahead and move the index ring to zero on this sight position.
Currently your rear sight is bottomed out, it needs to be brought up to get on target. Since it’s an AR-15, put six minutes (not clicks) of elevation on the rear sight (12 or 24 clicks, depending on if it’s a half-minute or quarter-minute increment sight). The idea is to get the rear sight aperture as low as it can be without the risk of running out of “down” adjustment for 200-yard or 100-yard events. For example, my normal come-up from 200 to 300 yards is only 14 clicks (3.5 MOA).
On these initial single-load impacts, the first trick is hitting the target, and bring the target closer if you need to. I suggest using a sight tool to thread the post up if the shots are going high and down if they’re going low. Shift the front sight housing toward the right if the shots are going right and to the left if the shots are going left. While you’re in position and holding on the aiming black, have an assistant shift the post position to the point on the target where the last impact was.
Now, and this is very important, if you are using an aftermarket supplied flat-faced front post (squared), the number of detent stops allowable at any one adjustment may increase, depending on the architecture of the post itself. The reason this is important is that we may not be able to discriminate nearly as well with smaller elevation incremental adjustments. A square post, truly square, can be moved one stop at a time. If the sides are lengthened, then it has to be moved two at a time.
THE WIND
 So, elevation covered, now wind. The wind can be tedious, but don’t rest until you have it. There’s also some back and forth between elevation and wind, because wind adjustments can likewise readjust the post height. An AR-15 that’s been tuned as closely as it can get, should not be sitting much more than an inch or so over the lateral center of the X-ring. However if it an inch higher, bring the post down a notch and do the rest of the elevation tuning on the back sight. Remember to retain some latitude for bringing elevation down for shorter-distance targets without bottoming the rear sight.
Now start shooting groups, and shoot these groups just as you would in a Rapid Fire event. Fire successive, self-loaded rounds, 10 at a time. This is very important! Don’t continue to fire single-load rounds. We’re not only establishing no-wind zero, but also the event-zero for the 300-yard Rapid Fire stage.
Make adjustments after the first group, then fire a couple of rounds to see if it was near what you expected, and then fire another group. Rinse and repeat. Fine-tune the elevation during this process as well. Don’t rest until you’re shooting impressive, very well-centered groups.
The test for event-zero is going to take at least one more group, I recommend shooting a full 20 rounds, or two 10-shot strings. If the shots are centered, then you found it. Make adjustments as needed to make it perfect, or until you run out of ammunition. There’s no harm at all in making small corrections at the back sight and calling it a day. Those corrections become your no-wind zero.
 Since there were a few things that were loosened and moved, these should get indexed. That just means making and/or marking a reference to the settings. I don’t think there’s such a thing as being too careful. Make a mark from the sight base across the elevation knob. On an AR-15 this mark should go from the elevation wheel to the receiver. The location of the mark matters only to how easily it can be seen … which should be easily. Count the clicks all the way down to bottom the rear sight. Write that down. Then count the clicks back up until you get to your index line. That’s your no-wind elevation.
Record windage in at least two places. The first mark goes from the wind knob to the rear sight base. I put this mark where it’s easy to see from your position, which for me is at the back of the knob. The second mark should be made on the flipped down aperture to the sight base itself. The reason for this mark in addition to the scale is so you can see when you’re back on zero.
Other competitors and those pesky targets should dread your walk up to the firing line, now that your sights are perfectly zeroed. Elevation and wind have nothing on you, and your front sight housing couldn’t be more accurately placed. So keep calm, carry on, and have a blast firing the smallest groups at your next competition.
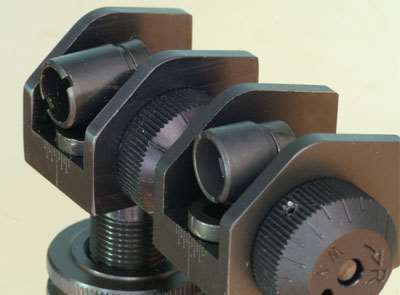
Hooded apertures can limit wind adjustment range. Click the knob all the way across in one direction until it stops, and make sure the hood isn’t getting pressured via contact at that point. If there are threads remaining it’s tempting to flex the hood by continuing to insist on getting a couple more clicks from it. Don’t do that. Just click it until it stops, gently. It will be the same stopping point on the other side after going back the other direction, so the calculated mechanical zero will still be correct.
FINDING MECHANICAL ZERO
Mechanical zero, as I define the term, is literally putting the rear sight in the center of its wind adjustment range. Establishing a mechanical zero that also coincides with a no-wind zero requires some capacity to move the front sight, but we’ll cover that shortly.
Here’s how to find mechanical zero; only speaking to windage adjustment. Run the rear sight in one direction, left or right, until it stops. Make sure the final stop is a true click, and not just snugging the wind knob against the limit of the rear sight aperture’s movement. Count the number of clicks in one direction, then again going the other direction until it stops. Make sure the last one or two clicks are still “free” or still resulting in click-stop sight movement. Divide by two. Then count that number of clicks in toward center. Record this. If you want to mark this indication on the rifle, stick a piece of masking tape on the rear sight base and make your mark on the tape. I wouldn’t advise a permanent mark yet.
To get a mechanical zero to coincide with actual no-wind zero we need a front sight that can move left and right. Chances are slim that putting a rear sight in the center of its adjustment range will result in wind-centered shots on target. Even if all alignments were spot-on, ammunition and shooter position variables come into play. AR-15’s have been modified to allow for front sight housing relocation, which functions to provide wind adjustment.
SIGHT ELEVATION
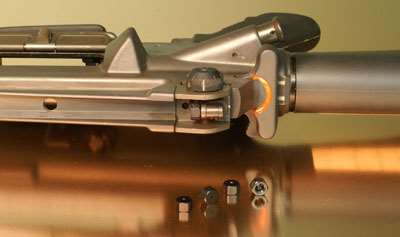
For this to work, we have to be able to move the front sight left and right. All AR-15 fronts will move up and down since the post threads in. The simplest means is a “clamp-on” front sight that has one or more headless screws to set it in place against the barrel. This front is from Olympic Arms and is a direct replacement for the conventional taper-pinned front sight housing attachment method.
Last thing before we get started, run the rear sight all the way down to its bottom. Make sure the last click before it bottoms is a full click. With a satisfactory click, go ahead and move the index ring to zero on this sight position.
Currently your rear sight is bottomed out, it needs to be brought up to get on target. Since it’s an AR-15, put six minutes (not clicks) of elevation on the rear sight (12 or 24 clicks, depending on if it’s a half-minute or quarter-minute increment sight). The idea is to get the rear sight aperture as low as it can be without the risk of running out of “down” adjustment for 200-yard or 100-yard events. For example, my normal come-up from 200 to 300 yards is only 14 clicks (3.5 MOA).
On these initial single-load impacts, the first trick is hitting the target, and bring the target closer if you need to. I suggest using a sight tool to thread the post up if the shots are going high and down if they’re going low. Shift the front sight housing toward the right if the shots are going right and to the left if the shots are going left. While you’re in position and holding on the aiming black, have an assistant shift the post position to the point on the target where the last impact was.
Now, and this is very important, if you are using an aftermarket supplied flat-faced front post (squared), the number of detent stops allowable at any one adjustment may increase, depending on the architecture of the post itself. The reason this is important is that we may not be able to discriminate nearly as well with smaller elevation incremental adjustments. A square post, truly square, can be moved one stop at a time. If the sides are lengthened, then it has to be moved two at a time.
THE WIND
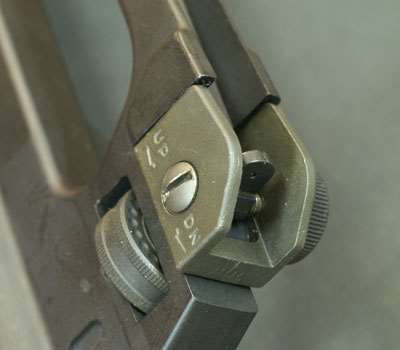
Run the rear sight all the way to its bottom, to that last full click. Loosen the index wheel and move it to zero (here marked with paint). Some match AR-15 sights don’t have a flat (the 8/3 indicator) on the index wheel to use for a reference, so you may need to make a mark.
Now start shooting groups, and shoot these groups just as you would in a Rapid Fire event. Fire successive, self-loaded rounds, 10 at a time. This is very important! Don’t continue to fire single-load rounds. We’re not only establishing no-wind zero, but also the event-zero for the 300-yard Rapid Fire stage.
Make adjustments after the first group, then fire a couple of rounds to see if it was near what you expected, and then fire another group. Rinse and repeat. Fine-tune the elevation during this process as well. Don’t rest until you’re shooting impressive, very well-centered groups.
The test for event-zero is going to take at least one more group, I recommend shooting a full 20 rounds, or two 10-shot strings. If the shots are centered, then you found it. Make adjustments as needed to make it perfect, or until you run out of ammunition. There’s no harm at all in making small corrections at the back sight and calling it a day. Those corrections become your no-wind zero.
On the AR-15, the flipped down aperture is the reference for wind movement, so introduce a mark from the index line on the aperture to the sight base. Repeat on the windage knob with a line drawn across the knob to match up with the paint mark on the sight base.
Record windage in at least two places. The first mark goes from the wind knob to the rear sight base. I put this mark where it’s easy to see from your position, which for me is at the back of the knob. The second mark should be made on the flipped down aperture to the sight base itself. The reason for this mark in addition to the scale is so you can see when you’re back on zero.
Other competitors and those pesky targets should dread your walk up to the firing line, now that your sights are perfectly zeroed. Elevation and wind have nothing on you, and your front sight housing couldn’t be more accurately placed. So keep calm, carry on, and have a blast firing the smallest groups at your next competition.